Last Updated on March 18, 2022 by Ted Mosby
Cleaning your home bathroom is a tedious but necessary task, and you have to do it one way or another. Just like that, if you have an RV, you have to clean and flush RV black tank to keep it in its optimal conditions.
If you are an RV enthusiast, chances are you already know that most of the RVs come with a grey and black water tank. A grey water tank is a storage tank that stores the water coming from both shower and sinks. At the same time, the black water tank stores the wastewater of the toilet.
Now, you might be thinking that it is an easy task as it sounds, which is not valid. Dumping the black tank of an RV is not enough. You have to clean it in a proper way, or the clog in the black tank will make the situation much worse.
Moreover, cleaning your RV black tank periodically is also necessary to improve the tank sensor’s performance, so that you get the readings as accurate as possible.
This post will discuss everything about the RV Black Tank Flush System, RV Black Tank Cleaning Solution, and How to Clean and Flush RV Black Tank.
So, let’s get started!
How to Clean Black Water Tank on RV?
If you are going to clean your RV black tank for the first time, get yourself prepared for an intimidating task.
But before you start cleaning your RV black tank, here are a few things that you should prepare first. Regardless of whether you are new to this or have done it before, this will help you both.
1. Protect yourself
First of all, you need to have gloves while preparing to dump your RV black tank. This will protect you from chemicals and bacteria.

Camping Gear SALE!
We have teamed up with Ape Survival to give you a huge 25% off EVERYTHING on their store! They have camping gear, hiking gear, survival gear and much more, all at 25% off when you click the link below.
SHOP NOW2. Get a water and sewer connection
Make sure you are fully hooked up and have a water and sewer connection. A sewer is useful to have that helps you to see everything flowing out of the black tank. You might find it nasty, but it also allows you to see the water, and when you see the clear water running out, it means your RV black tank is clean.
3. Avoid using Antifreeze or Bleach
This is critical. While cleaning your RV black tank, you should never use Antifreeze or bleach as it damages the rubber seals that will destroy your sewage system.
4. Clear out Blockages
While cleaning your RV black tank, it doesn’t mean that it will also clear out the blockages. You have to clear them out by yourself before you start the work.
How to Drain or Flush RV Black Tank?
You can easily drain your RV black tank by connecting your sewer hose to the dump station hole and the other end to the black tank valve. Now, open the tank valve and let the water flow.
But before that, below are a few steps that you should consider;
Step 1: Before dumping your RV black tank, make sure it is 3/4 full. But if you are going to dump your tank before this, make sure to fill the tank first.
Step 2: Make sure to dump the black tank first and then the gray tank. This will help you to flush out anything inside of the sewer hose.
Step 3: Do not use any harmful chemicals that cause any harm to waste tanks. Many public dump stations are closing down because of the unfriendly environment treatments by RVers. To keep these public dump stations open, make sure to use environmentally friendly treatments.
Step 4: Do not ever keep the black tank valve open. However, you can leave the gray water valve open.
Best and Simple Ways to Clean RV Black Water Tank
There are plenty of ways to clean the RV black tank. Here are some simple ways that you can use;
Camping Gear SALE!
We have teamed up with Ape Survival to give you a huge 25% off EVERYTHING on their store! They have camping gear, hiking gear, survival gear and much more, all at 25% off when you click the link below.
SHOP NOW1. Macerator
One of the best ways to clean and flush the RV black tank is to use the Macerator system. This system is used to throw high-velocity water jets into the black tank and sewer hose that easily remove the clogs. This system is also useful since it also pulverizes waste by throwing a high-pressure stream of water. It then throws out the waste through the drain hose.
They have clear connectors that enable you to see whether the tank is clean, while the included backflow preventer ensures to keep the water source clean. You just need to twist the nozzle’s bayonet into the RV waste valve and the other end to the dump station with a four-in-one adapter. Now you are all set to go.
2. Built-in Tank Rinser
Many RVs come equipped with an in-built rinsing system, known as a black tank flush. If your RV also has this system, you can hook a separate hose to the RV’s black tank flush inlet water valve. It is recommended to keep the black tank valve open when you flush the RV black tank to prevent water buildup and to come out into the bathroom.
This system can be compared to the power wash of the black tank to clean it deeply. You can also consult with your RV manual to get information about its rinsing system and how to operate it.
3. Ice Cubes
If you research cleaning and flushing the RV black tank, you will see the Ice Cube method. Some people place two or three bags into the RV black tank and then go to hit the road. Using the Ice Cubes method means you will be required to dump about 20 lbs of ice in the RV black tank, then adding some water, and then go for a drive to build friction between ice and waste clogs.
Now, the question is, does ice really work? Sort of. If you place the right amount of ice, it may remove the matter stuck on the walls.
However, I suggest you try any other method to save your ice to keep your drinks cold.
4. Flush Valve
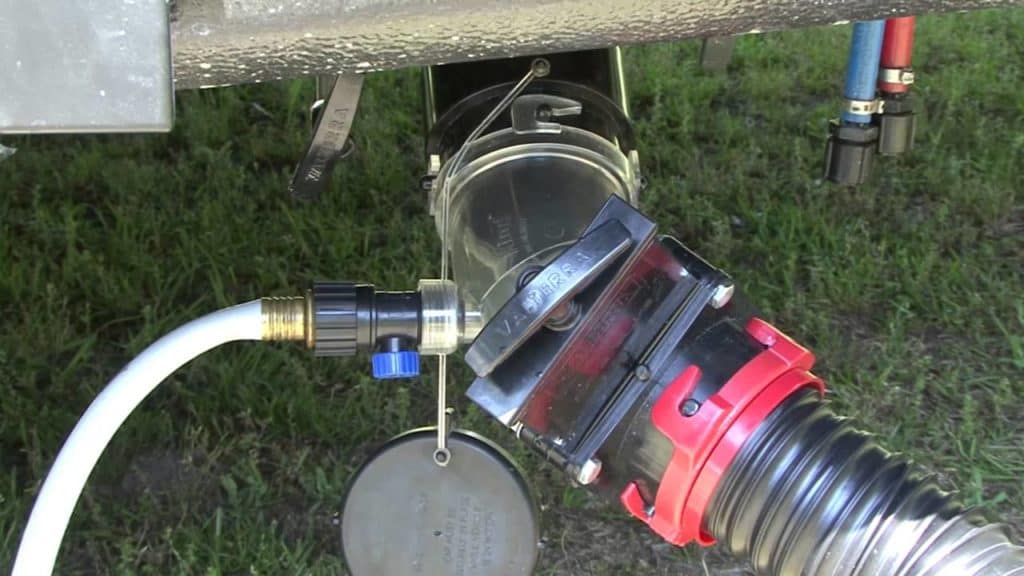
Flush Valves is another method that you can use to clean and flush RV black tanks. This method also helps to remove clogs and clean out tank sensors. To do this, just connect a garden hose to the barrel and then pick either the hose or tank setting to guide the water flow where you want it to be.
Flush valves also prevent the water backflow since they have in-built backflow preventers. It makes sure that the black water doesn’t back up into the hose. Moreover, most of the flush valves have clear barrels that allow you to see whether your RV tank is cleaned by clean water flow.
Furthermore, there are flush valves that can be easily attached and detached without using any additional tools. These valves just acquire you to attach one of their end to the black waste valve and another one to the sewer hose. Then attach the garden hose to the coupling on the barrel.
But if you want to permanently install a valve, they are also available. Though these valves require drilling work, they are DIY for most.
5. Yeast and Peroxide Flush
If your RV black tank has solids and odors and wants to get rid of them, you can try the yeast and peroxide method. This is yet another method to clean and flush RV black tank and an inexpensive one as well. To do that, you just need to add a gallon of water, 4-ounce of yeast, and 10-ounce of peroxide to the empty black tank.
Then go for a drive to anywhere you want until the mixture starts splashing out the tank. Now empty the black tank, and refill it with water and other normal treatment. This method is tried by many and found useful to remove odors and solids.
Best Ways to Treat RV Black Tank
Note: Before treating your RV black tank, you have to add water back to the tank. To flush a black tank, till the toilet with the water and flush until the water hits the black tank’s bottom.
After flushing and cleaning RV black tank properly and removing solids and odors from the walls, you will be now required to treat the tank to make it ready for future use. Treating an RV black tank helps to eliminate and prevent solids and clogs. It would be best to treat the RV black tank each time you clean it.
Here are some ways to treat your RV black tank,
1. Liquid Treatment
Most of the liquid treatments are chemical-free, which means they are best to break the waste without using any harmful chemicals that are not environment friendly. Using liquid treatment, you have to add some water that completely covers the black tank’s bottom. Then add the liquid and flush. However, using the liquid treatment, make sure to use the right amount of liquid.
2. DIY Treatments
Rather than using premade methods, most RVers prefer their DIY treatments. However, using a DIY treatment, make sure to use environmentally friendly products. GEO treatment is one of the most popular DIY treatments used by many RVers. It is excellent to prevent solids from adhering to the tank sensors.
This is also the oldest treatment used by most RVers. It includes a cup of liquid softener, such as Calgon or Broax, and a detergent cup used for laundry. This is an inexpensive and highly recommended DIY treatment that you should try.
a. Water, Water, and Water
Most RVers don’t use any chemicals and additives. If you are also one of those RVers, make sure to use a lot of water to prevent solids and odors build up. Moreover, make sure to flush the black tank properly after you dump it using any of the above RV black tank cleaning methods.
b. Dawn Liquid Soap
Another typical RV black tank treatment is the use of Dawn Soap. This method is more effective if you add a water softener in it. However, the usage of a water softener is not mandatory as it can treat the black tank on its own. Many RVers use this method because it is a simple and effective way to prevent solids and odors from building up. It only requires a cup of Dawn Soap, and you are good to go.
Wrapping Up
Keeping your RV in its optimal condition is a tough job but not as tough as keeping the RV black tank clean by preventing the solids and odors build up. It is essential to clean and flush the RV black tank after each trip.
Moreover, you should also clean and flush RV black tank when it is not in use, and you are considering storing it in the garage.
Above, I’ve discussed how to clean RV black tank, flush it, and treat it. I know it is not a fun task, but it is necessary. If you have any other tips regarding cleaning and flushing an RV black tank, you can comment below.
FAQ
Yes, you can use bleach by mixing it with water in your RV black water tank to prevent the solids and odors build up.Can I use bleach in RV black water tank?
You should never ever leave the black tank valve open, or else all the liquid will flow out. So, always ensure that the black tank valve is tightly closed after you dump the black tank.Do I have to close the black water tank?
Before dumping the black water tank, make sure it is 2/3 full. Not dumping the black tank for longer intervals will help to break the solids down.When should I dump the black water tank?
Table of Contents